|
|
TRAINMASTER
BY WERNER MEER US-RAILROAD-SHOP KILCHBERG |
|
|
|
TRAINMASTER
BY WERNER MEER US-RAILROAD-SHOP KILCHBERG |
|
updated: 6/22 (Part 11)
/ updated: 10/22 (Part 12)
/ updated: 2/24 (Part 13 and 14)
updated: 8/24 (Part 15) /
updated: 1/25 (Part 16 & 17) /
updated: 10/25 (Part 18)
Second Section: Part 11 to Part 18
X.jpg)
X.jpg)
| From a Diorama to a complete Layout - step by step ! (Second Section) |
| HO Scale: BNSF DESERT AND SIERRA SUB by Bernard Frontanau (France) |
| Detailed informations about the contruction of my layout you will find on the first section: click here |
|
New 6/22: Part 11 = COMPLETING THE UPPER LEVEL WHILE CONNECTING TO THE
SUMMIT AREA. New 10/22: Part 12 = PROGRESSING EAST TOWARD LOWER LEVEL. New 2/24: Part 13 = CARRYING ON EASTWARD AND INSTALLING A LIFT-UP ACCESS HATCH New 2/24: Part 14 = LOWER REVERSING LOOPS AND HELIX CONNECTION. PLANS OF THE BNSF DESERT & SIERRA SUB. New 8/24: Part 15 = PROGRESSING EASTWARD AND BUILDING THE REMOVABLE SECTION AT THE ENTRY DOOR New 1/25: Part 16 and 17 = Progressing eastward and last connection. Layout virtually completed. New 10/25: Part 18 = Climbing the Sierra - a Daily duty |
Photos copyright by Bernard Frontanau
(for bigger size photos please click on
4-digit number under each photo)
added:
6/22
|
Part 11:
Completing the Upper Level while
connecting to the Summit Area. by B. Frontanau (France) BNSF DESERT AND SIERRA SUB |
|
X.jpg) |
X.jpg) |
| 1160 - On the left are the two parts to be connected, below the end of part 7 and on top the start of the summit area seen in part 8 | 1162 - Test fitting the new module. Below is the helix not finished at the time, in the background is part of the return loop and also behind the brown, now blue fascia. |
X.jpg) |
X.jpg) |
| 1163 - Seen from behind is the connection with the already completed summit area covered in part 8. | 1164 - Extending the roadbed. The last clamp in the back stands at the highest point of the layout: rail top at 179 cm above the floor. |
X.jpg) |
X.jpg) |
| 1165 - Back on the sawhorses. Scenery well on its way. Notice the area for a future snowshed. | 1167 - Reverse viewing angle. |
X.jpg) |
X.jpg) |
| 1168 - Snowshed west exit. | 1171 - Aerial view. |
X.jpg) |
X.jpg) |
| 1174 - Module west end connected to the summit area. | 1175 - Another viewing point. |
X.jpg) |
X.jpg) |
| 1176 - Landscape east of the snowshed. | 1178 - East end of the now installed module. |
X.jpg) |
X.jpg) |
| 1186 - Reverse angle, compare with photo 1163. | 1189 - From behind: the snowshed east exit. |
X.jpg) |
X.jpg) |
| 1190 - Farther east, this is the geographical summit of the line. | 1191 - Facing view of the snowshed. |
X.jpg) |
X.jpg) |
| 1192 - Another view of the now connected area. Note the tiny arch. | 1194 - Closer view of the natural arch |
X.jpg) |
X.jpg) |
| 1193 - Overall view, in the foreground is the start of the next wooden frame. | 1196 - Building the wooden frame. |
X.jpg) |
X.jpg) |
| 1204 - Top view of a future "lake". | 1206 - Bottom view. |
X.jpg) |
X.jpg) |
| 1207 - Installing a short bridge to span the lake outlet. | 1215 - Starting the eastern connection. |
X.jpg) |
X.jpg) |
| 1211 - Wider angle. | 1219 - Well progressing scenery. |
X.jpg) |
X.jpg) |
| 1220 - more scenery. | 1221 - more scenery. |
X.jpg) |
X.jpg) |
| 1225 - Different angle. An island will soon "appear". | 1227 - Closer view. |
X.jpg) |
X.jpg) |
| 1228 - "Home sweet home" by the lakeshore. | 1231 - Still "dry", the island is in place. |
X.jpg) |
X.jpg) |
| 1232 - Another view. | 1235 - Different angle. |
X.jpg) |
X.jpg) |
| 1239 - A wider view. | 1251 - Wooden frame and subroadbed completed. |
X.jpg) |
X.jpg) |
| 1252 - Different angle. | 1253 - Well ! still some work ahead. |
X.jpg) |
X.jpg) |
| 1254 - Underneath view...quite messy but spots are installed for the future. | 1260 - And yes ! there is "water" in the lake. |
X.jpg) |
X.jpg) |
| 1263 - Lake view. | 1315 - Lake view. |
X.jpg) |
X.jpg) |
| 1320 - Lake view. | 1265 - Lake outlet. |
X.jpg) |
X.jpg) |
| 1270 - Lake view. | 1271 - A peacefull home by the lakeshore. |
X.jpg) |
X.jpg) |
| 1268 - Trains coming out of the tunnel in order to gain altitude, make a big loop to reach the summit of the line, and then encounter a short and easy downgrade passing over the tunnel portal they exited a few minutes ago. They then arrive to the RR summit complex. | 1275 - Scenery is progressing around the dirt road underpass. |
X.jpg) |
X.jpg) |
| 1276 - Scenery and upper level completed. | 1279 - Looking west, almost the top of the line. |
X.jpg) |
X.jpg) |
| 1281 - View down toward the lake, in the foreground is a drying pond. | 1284 - Different angle. |
X.jpg) |
X.jpg) |
| 1285 - Close-up view. | 1289 - A westbound is fighting the 3% grade to reach summit. |
X.jpg) |
X.jpg) |
| 1290 - Side track view. | 1291 - Aerial view. |
X.jpg) |
X.jpg) |
| 1292 - Crossing the short bridge. | 1294 - Farther west. |
X.jpg) |
X.jpg) |
| 1295 - Close from the summit. | 1297 - Railroading in the southwest, big diesels through a wild sierra crossing. |
X.jpg) |
X.jpg) |
| 1299 - Top of the line. | 1300 - About to enter the snowshed. |
X.jpg) |
X.jpg) |
| 1302 - On the gentle downgrade leading to the RR summit. | 1305 - Reaching the summit east switch. |
added: 10/22
|
Part 12: Progressing East toward lower level
by
B. Frontanau (France) This part starts where Part 10, photo 1258, ended. BNSF DESERT AND SIERRA SUB |
|
X.jpg) |
X.jpg) |
| 1306 - First wooden frame is in place, testing the subroadbed. A creek will flow under a future bridge. | 1307 - Extending east, the "creek" bed is in place. |
X.jpg) |
X.jpg) |
| 1308 - Opposite view. | 1309 - Extending the wooden frame and installing the subroadbed. |
X.jpg) |
X.jpg) |
| 1311 - Working on the bridge, a portion of the creek bed had to be completed before installing the roadbed. | 1312 - Another view, the helix in the background will be soon hidden. |
X.jpg) |
X.jpg) |
| 1313 - Back to styrofoam stage. | 1336 - Plaster is carved, ground cover is added. |
X.jpg) |
X.jpg) |
| 1338 - Working on a future arch | 1340 - Things are taking shape |
X.jpg) |
X.jpg) |
| 1341 - Different angle | 1343 - Installing two short bridges to span the creek. |
X.jpg) |
X.jpg) |
| 1344 - Bridges completed, abutments and support walls in progress | 1345 - Different viewing angle |
X.jpg) |
X.jpg) |
| 1346 - Scenery above the arch. | 1347 - Scenery above the arch. |
X.jpg) |
X.jpg) |
| 1348 - Making a mold for future tunnel portals | 1349 - In the foreground, vestiges of the original narrow gauge right-of-way are visible |
X.jpg) |
X.jpg) |
| 1350 - One of the portals. Inspiration came from the portals standing at Kyune, Utah, on the eastern slope of Soldier Summit. The line, now UP, used to be owned by the D&RGW | 1351 - Installing the west portals |
X.jpg) |
X.jpg) |
| 1352 - Tunnels are completed, these are the west portals. | 1355 - Reverse angle |
X.jpg) |
X.jpg) |
| 1356 - East portals | 1358 - Styrofoam stage again |
X.jpg) |
X.jpg) |
| 1359 - More styrofoam | 1360 - Progression along the creek |
X.jpg) |
X.jpg) |
| 1361 - Another angle | 1362 - Vestiges of the now gone bridge which carried the narrow gauge right-of-way |
X.jpg) |
X.jpg) |
| 1363 - West end scenery completed | 1364 - A different viewing angle |
X.jpg) |
X.jpg) |
| 1365 - More views | 1366 - More views |
X.jpg) |
X.jpg) |
| 1367 - Aerial view, the creek is still dry | 1368 - Reverse view |
X.jpg) |
X.jpg) |
| 1371 - Closer view of the west portals | 1373 - "Water" is flowing down the creek. Handrails will be eventually added on the bridges sides |
X.jpg) |
X.jpg) |
| 1378 - Aerial view of the creek fall | 1375 - Scenery virtually completed |
X.jpg) |
X.jpg) |
| 1376 - Temporary end of the eastern progression | 1377 - Another view |
X.jpg) |
X.jpg) |
| 1380 - Handrails added to the bridges | 1379 - Another view of the creek |
added: 2/24
|
Part 13:
CARRYING
ON EASTWARD AND INSTALLING A LIFT-UP ACCESS HATCH
by
B. Frontanau (France) BNSF DESERT AND SIERRA SUB |
|
| I didn't like the bridges handrails seen in part 12, photo 1380, so I removed them. I have to think about redoing them or not. Future will tell. This Part 13 shows the progress east of the twin Tunnels. There was a great amount of scenery to be built, and I had to create an access hatch in case a derailment would occur on the upper track by the "big loop" tunnel portal. (Pls note: All photos have been taken before July 2023) | |
X.jpg) |
X.jpg) |
| 1381 - Start of the styrofoam stage. | 1382 - Opposite viewing angle. |
X.jpg) |
X.jpg) |
| 1383 - With and without the access hatch. The arrows show the limits. | 1384 - With and without the access hatch. The arrows show the limits. |
X.jpg) |
X.jpg) |
| 1386 - Progressing scenery. | 1389 - Progressing scenery. |
X.jpg) |
X.jpg) |
| 1387 - Scenery close-up by the upper track portal. | 1392 - Start of the plaster work at the east portals. |
X.jpg) |
X.jpg) |
| 1398 - Open grid is installed and the subroadbed is tested. | 1399 - Open grid is installed and the subroadbed is tested. |
X.jpg) |
X.jpg) |
| 1400 - Progressing scenery. Only one roadbed is permanently attached, so I can stand inside the grid to work on the landscape. | 1401 - Progressing scenery. Only one roadbed is permanently attached, so I can stand inside the grid to work on the landscape. |
X.jpg) |
X.jpg) |
| 1404 - The second roadbed is installed. The board in the foreground is the future creek bed. The track is partially ballasted, far side and in between the rails. The inside will wait for scenery completion. | 1405 - The second roadbed is installed. The board in the foreground is the future creek bed. The track is partially ballasted, far side and in between the rails. The inside will wait for scenery completion. |
X.jpg) |
X.jpg) |
| 1406 - Progressing scenery. | 1407 - Progressing scenery. |
X.jpg) |
X.jpg) |
| 1408 - Progressing scenery. | 1409 - Progressing scenery. |
X.jpg) |
X.jpg) |
| 1410 - The scenery is completed. | 1411 - The scenery is completed. |
X.jpg) |
X.jpg) |
| 1412 - Completed scenery. Some ballast still to come. | 1413 - Completed scenery. Some ballast still to come. |
X.jpg) |
X.jpg) |
| 1417 - Temporary end of the eastbound scenery progression, | 1418 - Temporary end of the eastbound scenery progression. |
X.jpg) |
X.jpg) |
| 1420 - Details: oil dealer and scrap yard. | 1421 - Details: oil dealer and scrap yard. |
X.jpg) |
X.jpg) |
| 1422 - More details, scrap yard. | 1424 - More details, scrap yard. |
X.jpg) |
X.jpg) |
| 1425 - More details, loading dock. | 1426 - More details, loading dock. |
added: 2/24
|
Part 14: - LOWER REVERSING LOOPS AND HELIX
CONNECTION. - PLANS OF THE BNSF DESERT & SIERRA SUB. by B. Frontanau (France) BNSF DESERT AND SIERRA SUB |
|
|
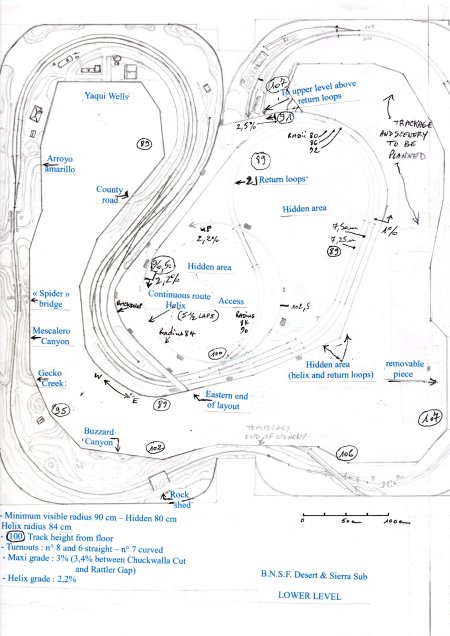
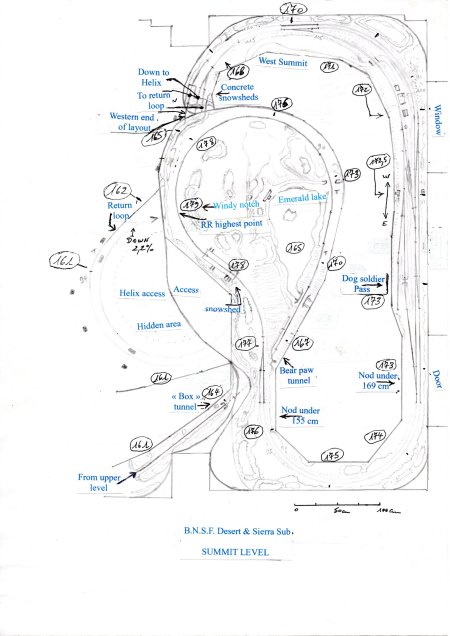
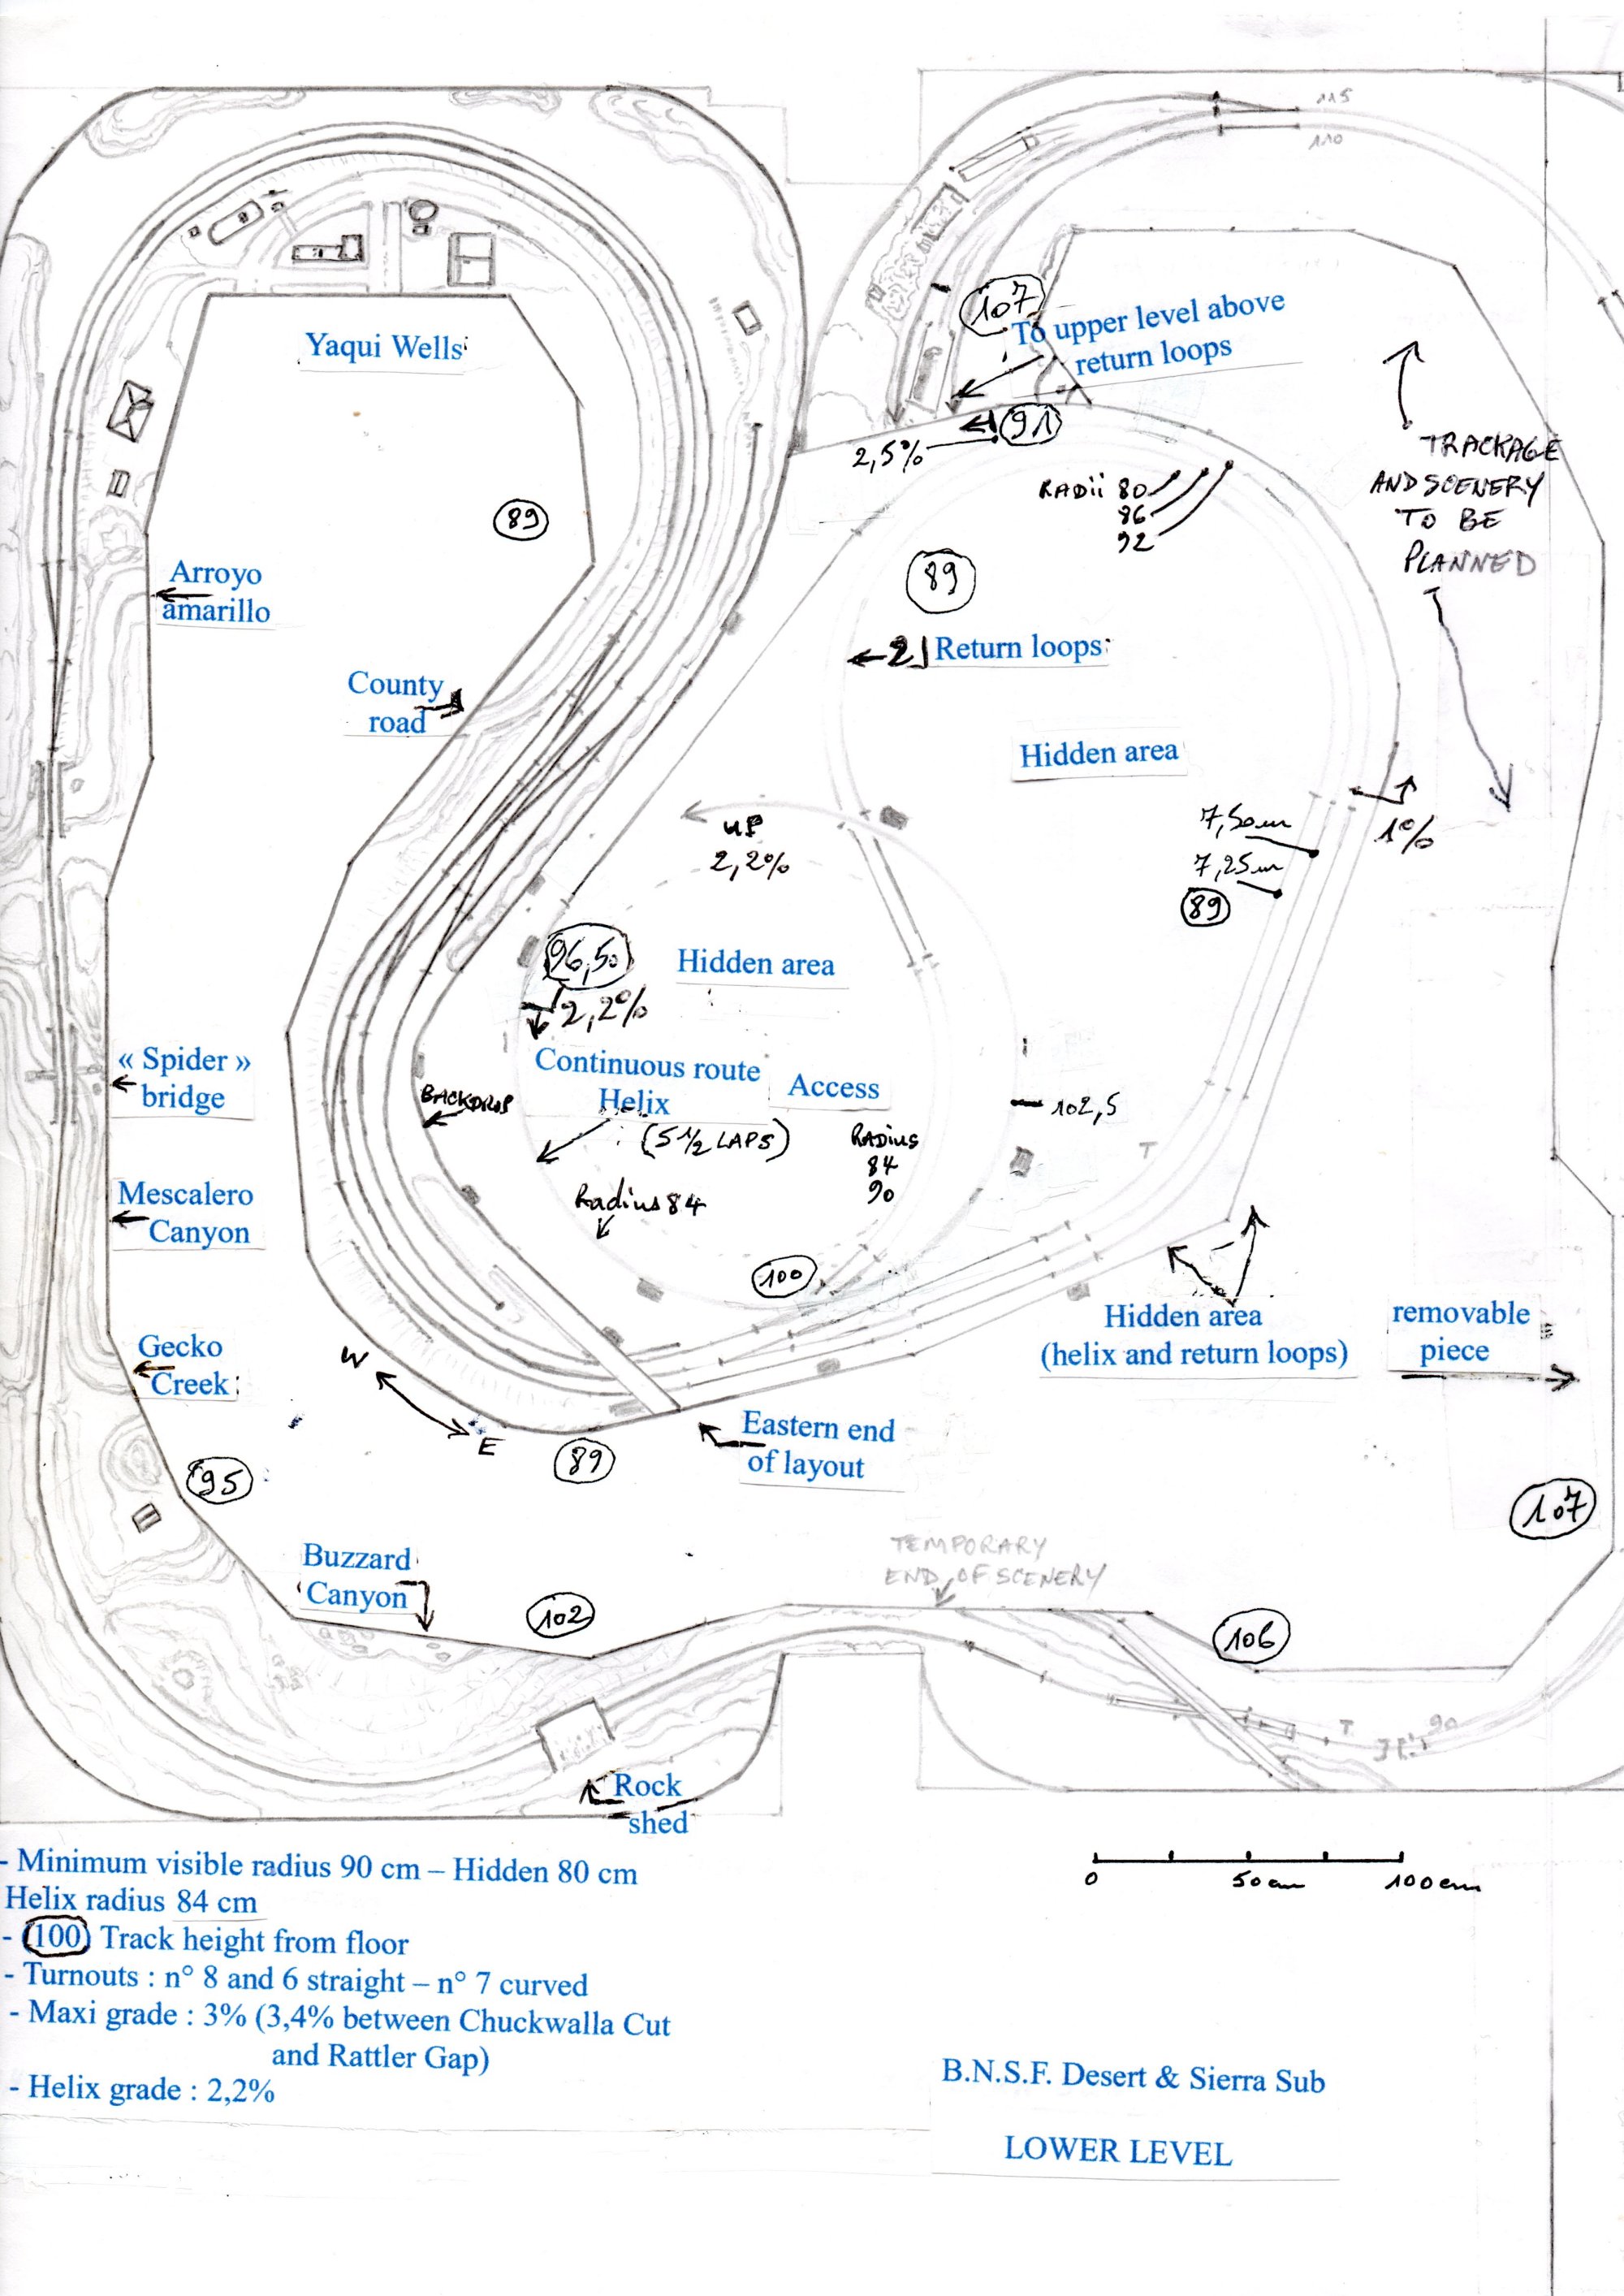
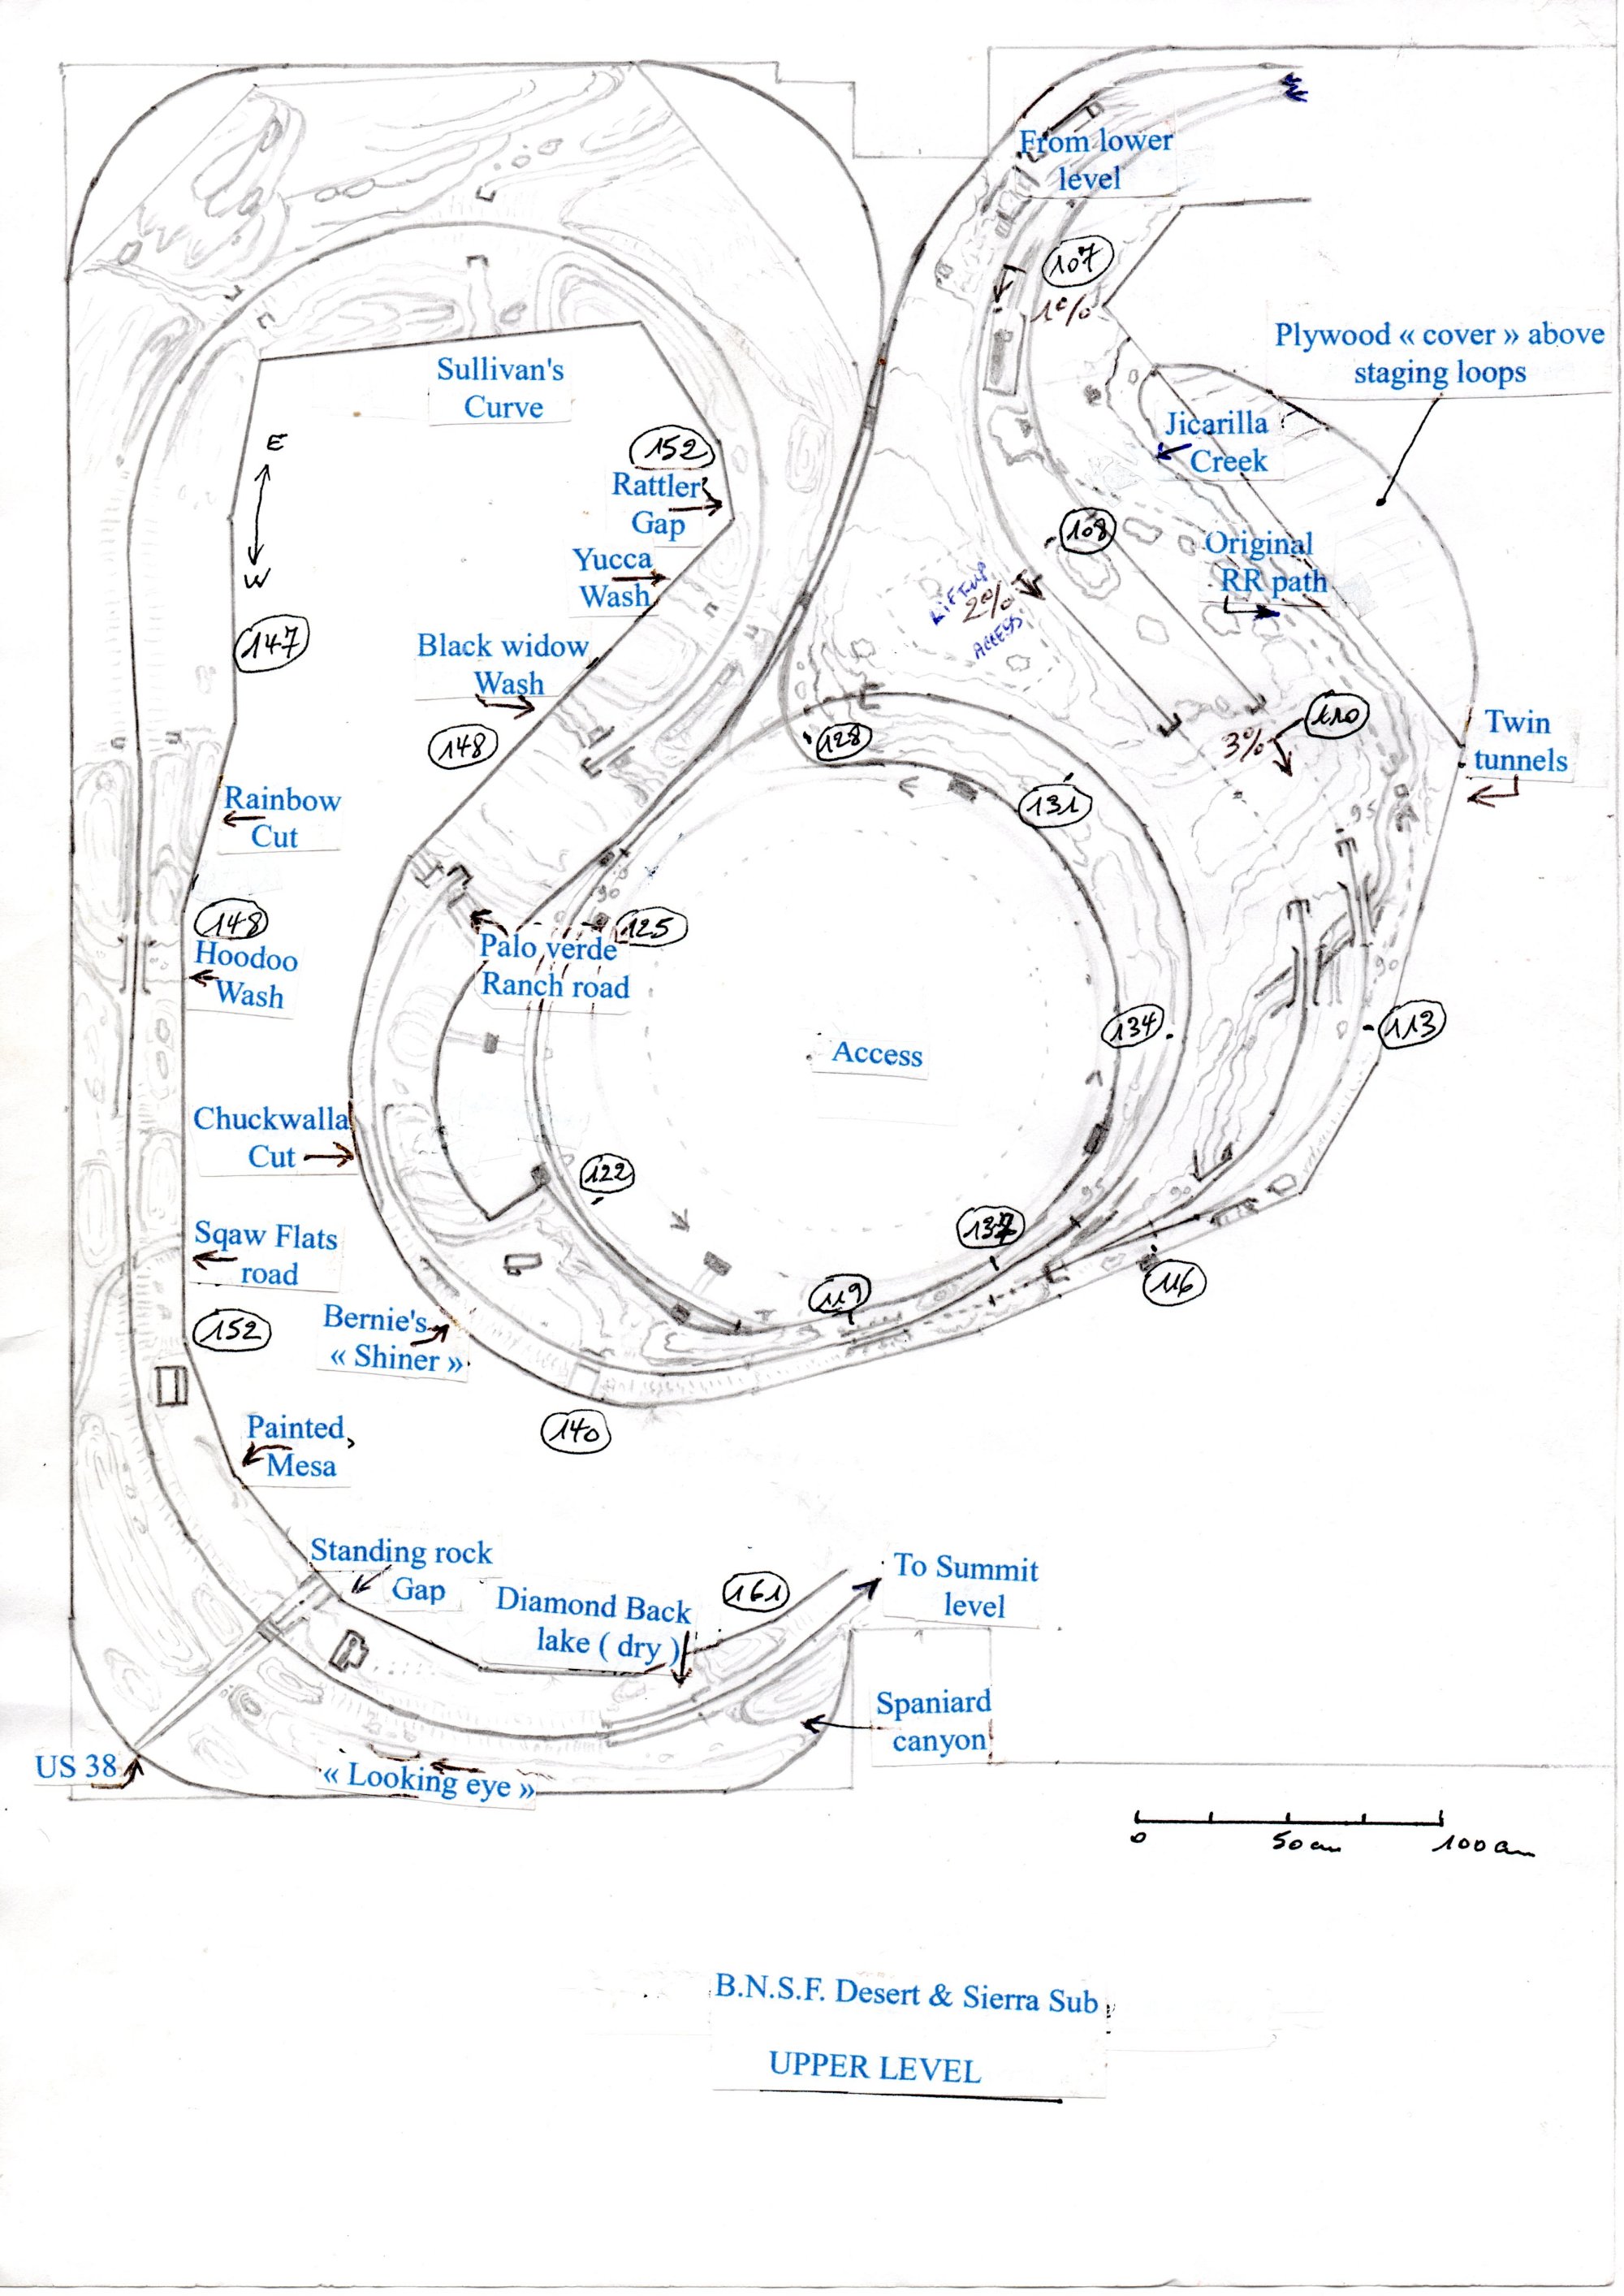
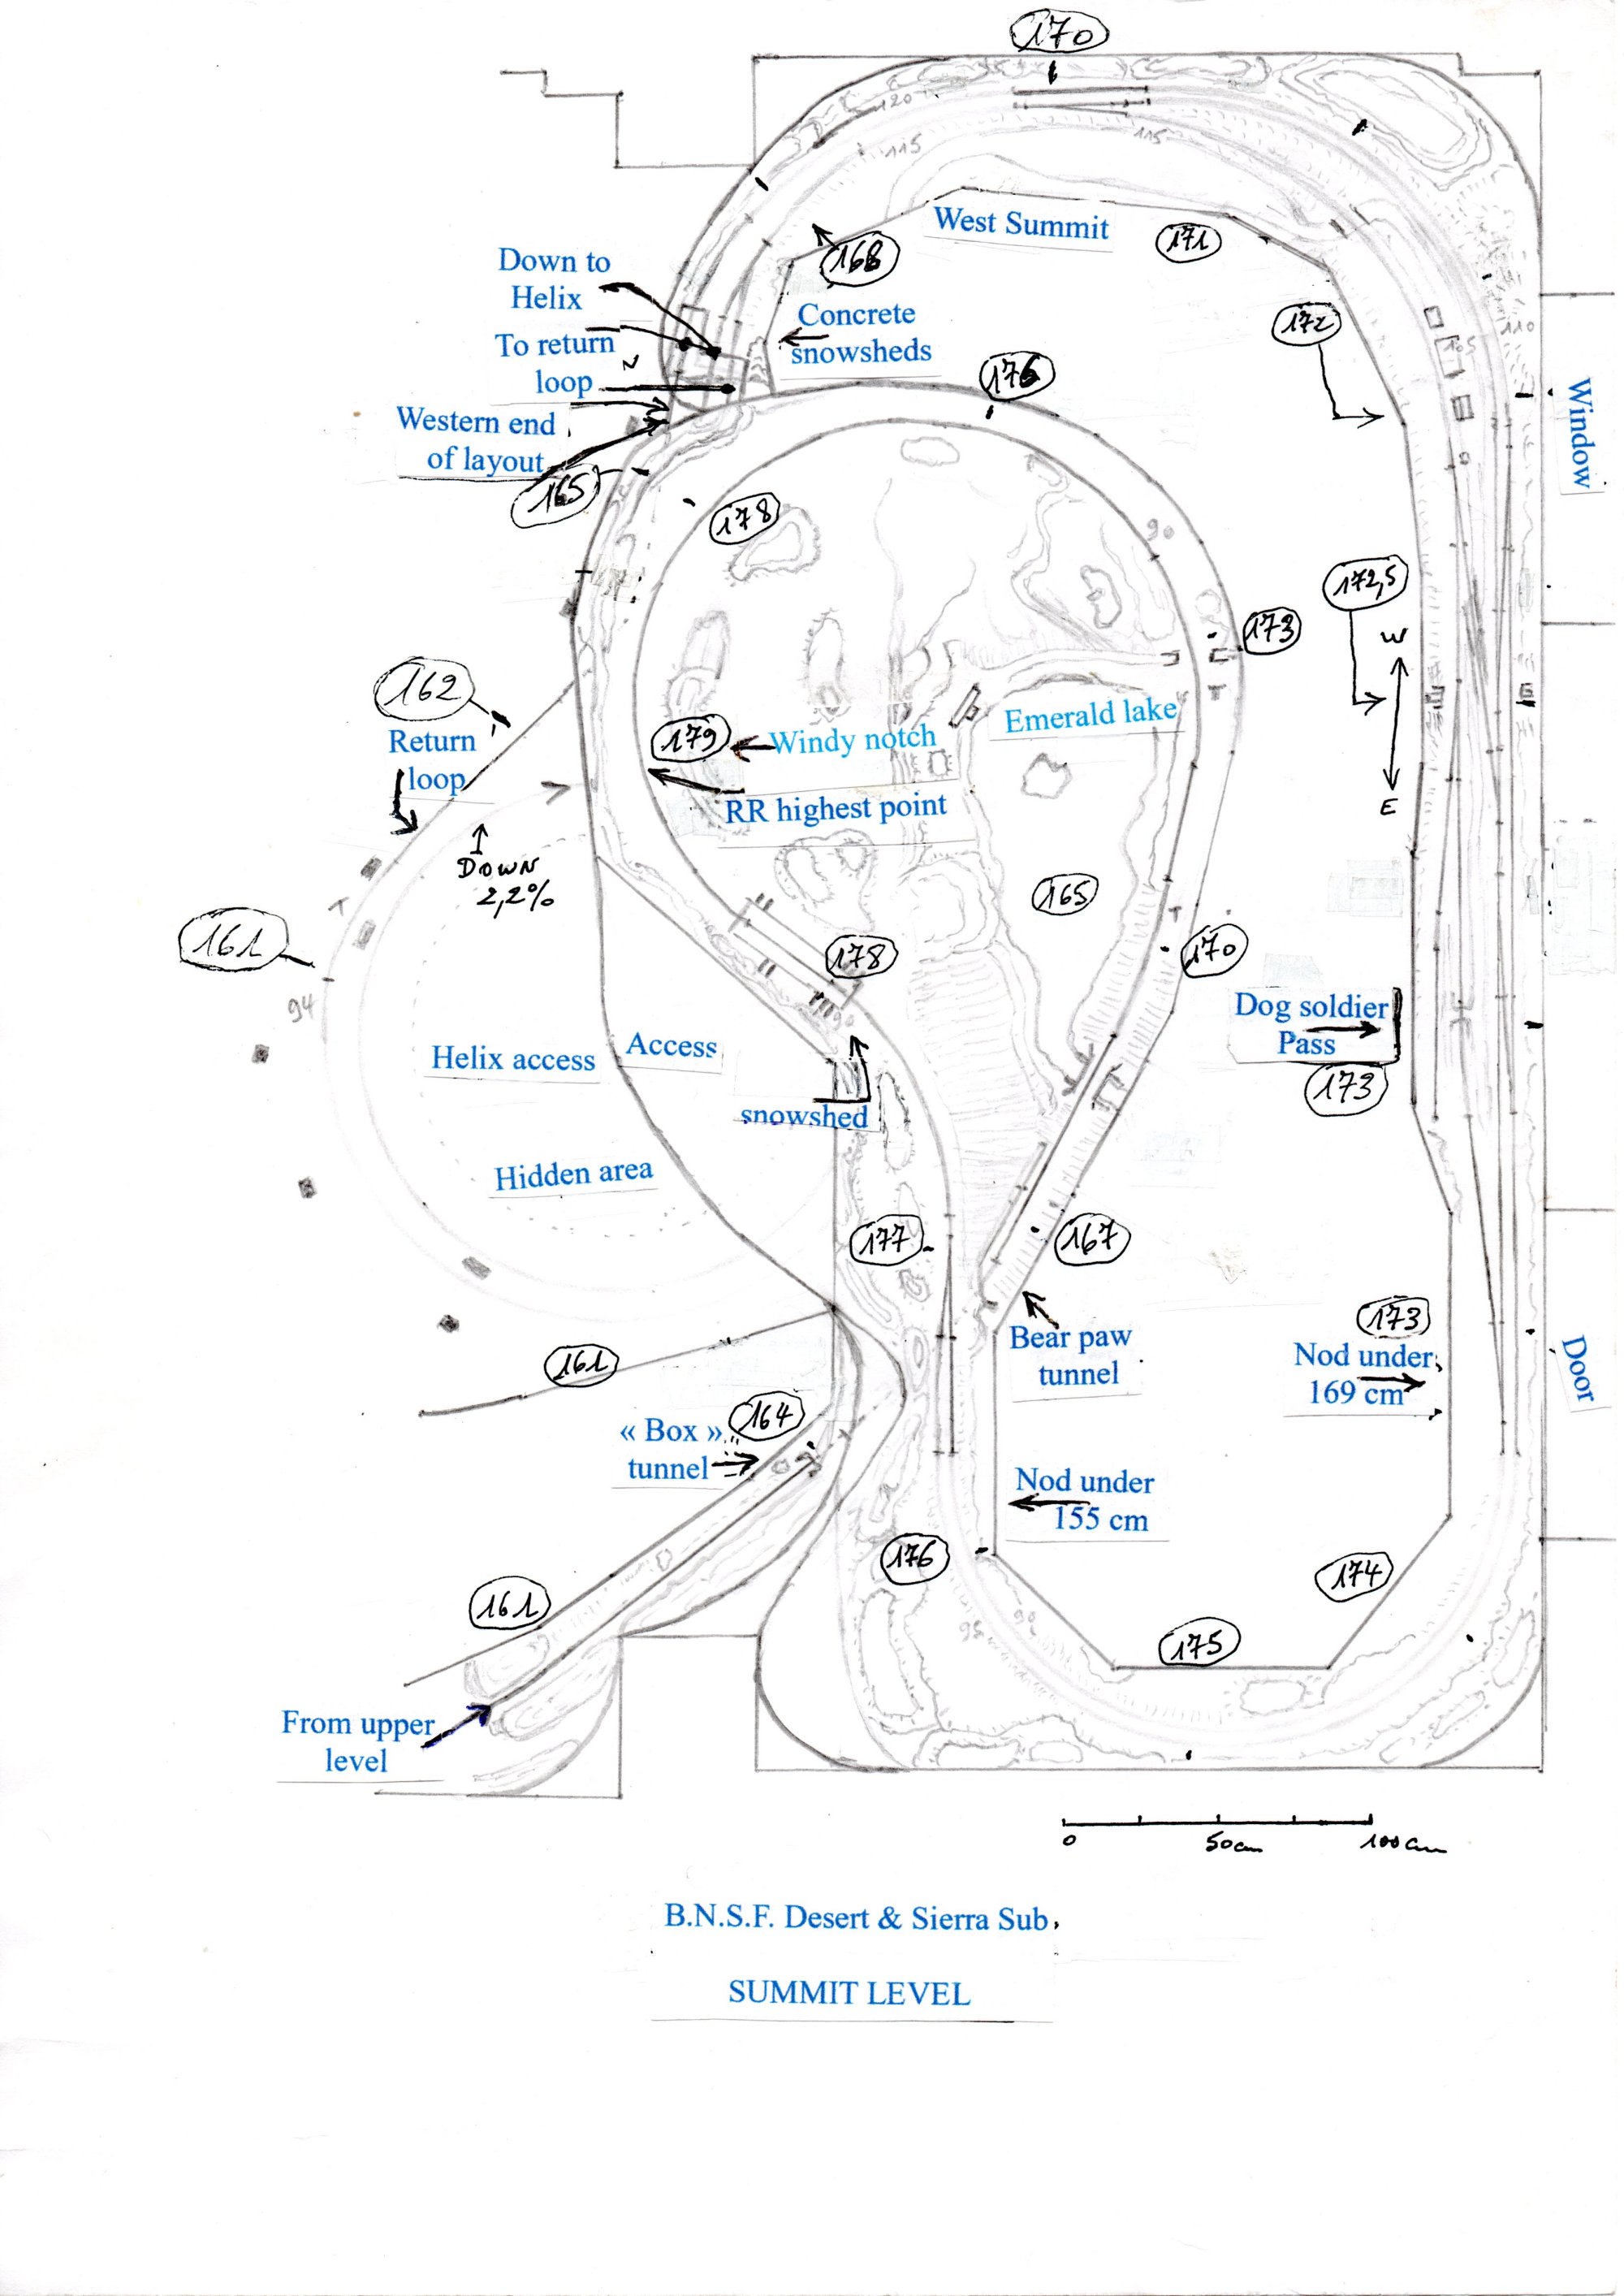
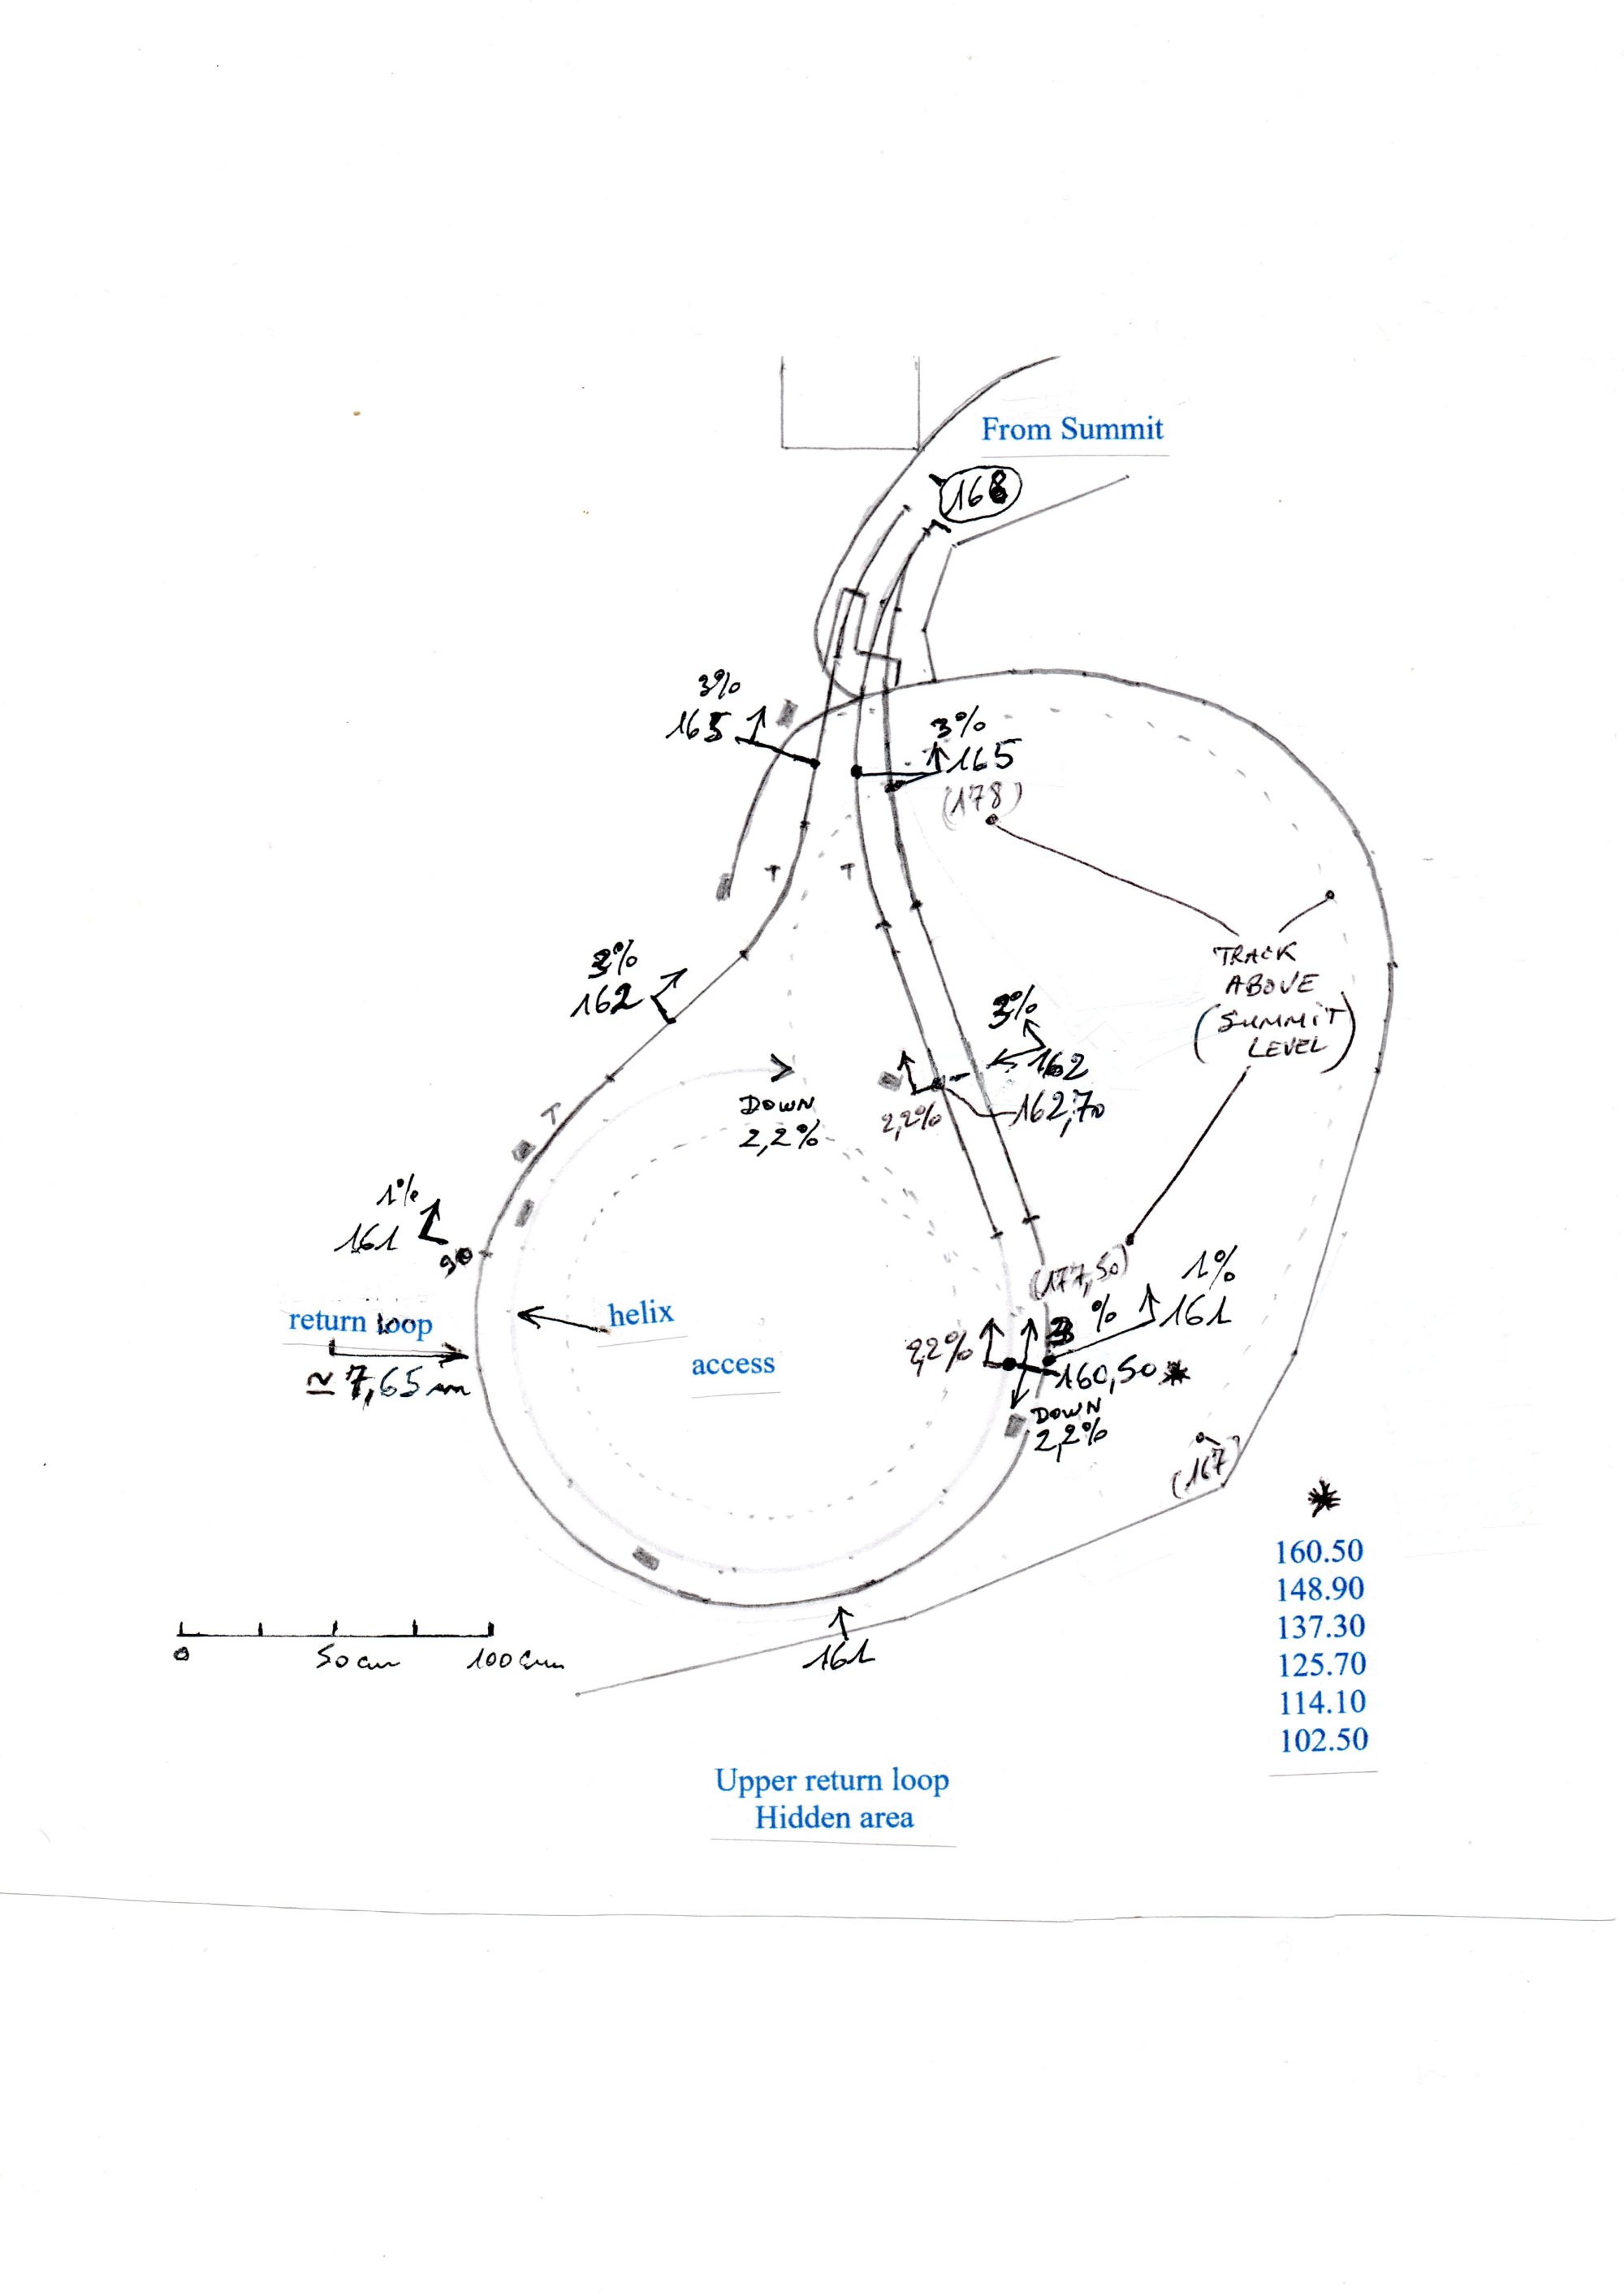
Part 14 is a short word about the lower loops and
lower connection to the helix, and also four plans showing how things are
connected, and the names given to the different spots found along the line. Plan 1 is the lower level. Plan 2 is the upper level. Plan 3 is the summit level. Plan 4 is the upper loop and the upper connection to the helix, this last part is hidden under the summit level. |
|
X.jpg) |
X.jpg) |
| 1427 - Lower hidden area. In the foreground is the track connecting the helix, then the two ends of the two reversing loops can be seen. Only one is completed. | 1428 - Opposite view. In the distance is where eastbounds enter the hidden area and where westbounds quit it. |
 |
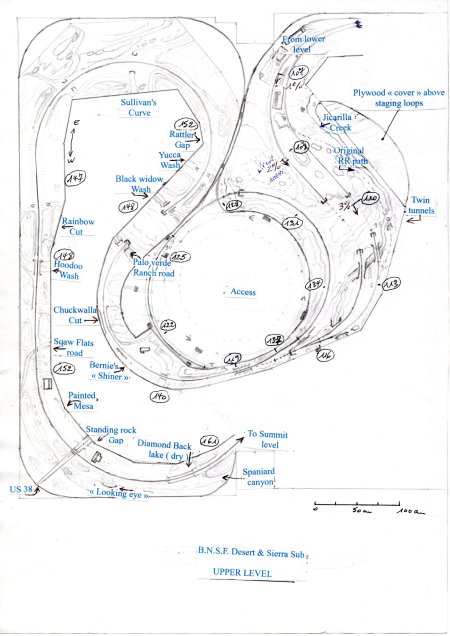 |
| Plan 1 - Lower level, the right side, partially hidden, is not totally planned nor completed. | Plan 2 - Upper level. |
 |
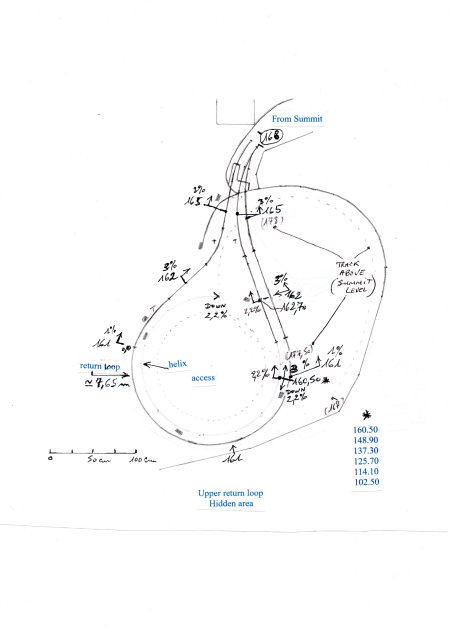 |
| Plan 3 - Summit level. | Plan 4 - Upper reversing loop and upper access to the helix. This trackage is hidden below the summit level. |
added: 8/24
|
Part 15: - PROGRESSING
EASTWARD AND BUILDING THE REMOVABLE SECTION AT THE ENTRY DOOR by B. Frontanau (France) BNSF DESERT AND SIERRA SUB |
|
X.jpg) |
X.jpg) 1504 - Progressing eastward. The different sizes of cables I use are visible: Stranded 0,5 mm2 soldered to rail, connected to 2,5 mm2, itself connected to the main bus: 4mm2 X.jpg) |
| Plan 5 - Completed plan, lower level (see Part 14 plan 1), right side of the room | 1553 - "Scenery detail, the pump is actually moving." |
X.jpg) |
X.jpg) |
| 1506 - Hidden underneath the plywood cover are, the outside track which leads to the helix, inside track is a return loop. A second return loop will be installed inside the first one. | 1505 - Wooden grid stage, it will carry the helper locos refueling service. |
X.jpg) |
X.jpg) |
| 1429 - Scenery completed | 1430 - Scenery completed |
X.jpg) |
X.jpg) |
| 1431 - The rear track is the spur to the loading dock- | 1432 - The locos service area is taking shape |
X.jpg) |
X.jpg) |
| 1433 - Closer view | 1435 - Yard office installed |
X.jpg) |
X.jpg) |
| 1436 - Abandonned past in the desert dust | 1438 - Overall view. The rear track sand tower is no more in use |
X.jpg) |
X.jpg) |
| 1440 - Closer view | 1441 - Closer view |
X.jpg) |
X.jpg) |
| 1442 - Closer view | 1456 - Waiting helper |
X.jpg) |
X.jpg) |
| 1457 - Idling switcher | 1463 - Waiting for the call of duty |
X.jpg) |
X.jpg) |
| 1462 - Details close-up | 1459 - Higher viewing angle |
X.jpg) |
X.jpg) |
| 1455 - More details | 1446 - Progressing East |
X.jpg) |
X.jpg) |
| 1447 - In the foreground is the site for a future industry | 1448 - This is the interface for the future removable section (room entry door). |
X.jpg) |
X.jpg) |
| 1450 - Building the removable section | 1451 - Side view |
X.jpg) |
X.jpg) |
| 1452 - West interface | 1453 - East interface |
X.jpg) |
X.jpg) |
| 1464 - Scenery progression |
1469 - Western part of the removable section and the removable section of
backdrop. In the foreground the spur/tail track for the coming industry. |
X.jpg) |
X.jpg) |
| 1470 - Opposite view looking East | 1471 - Removable section / backdrop almost completed. |
X.jpg) |
X.jpg) |
| 1512 - A small shack added by the tail track. | 1490 - Overall view of the now completed industry and local water tower. |
X.jpg) |
X.jpg) |
| 1491 - Aerial view | 1493 - Aerial view |
X.jpg) |
X.jpg) |
| 1488 - Closer view | 1489 - Closer view |
X.jpg) |
X.jpg) |
| 1508 - Closer view | 1494 - Side view. Bins are loaded by a front loader. |
X.jpg) |
X.jpg) |
| 1509 - More views | 1510 - More views |
X.jpg) |
X.jpg) |
| 1511 - Different angle | 1513 - Removable section, different angle. In the distance is the start of the future Part 16. I'll see you then! |
added: 1/25
|
Part 16: - PROGRESSING
EASTWARD AND LAST CONNECTION: LAYOUT VIRTUALLY COMPLETED by B. Frontanau (France) BNSF DESERT AND SIERRA SUB |
|
X.jpg) |
X.jpg) |
| 1472: Building Dead Horse Canyon. West end. | 1473: Center part. |
|
Inspiration for this canyon scene came from a trip
through Feather River Canyon in the Sierra Nevada, Northern California. I
was fascinated by the site of Pulga crossing where the railroad (UP, former
WP) crosses over the river and, high above it, the highway bridge crosses
the canyon in the opposite direction. Well I had no intention to build a HO scale replica of Pulga crossing, but I knew it could lead to something relatively spectacular. |
|
X.jpg) |
X.jpg) |
| 1474: East end, the plywood board is the future river bed. | 1476: Looking west. |
X.jpg) |
X.jpg) |
| 1478: Future site of a short rocky tunnel. | 1479: Testing the placement. |
X.jpg) |
X.jpg) |
| 1480: Track ballasted and weathered, ready for the tunnel. | 1481: Plaster work, west side. |
X.jpg) |
X.jpg) |
| 1482: Plaster work, east side. | 1483: West side,"rock" work completed. |
X.jpg) |
X.jpg) |
| 1484: Testing a mock-up for the future highway bridge. | 1486: Testing the mock-up, to the right a retaining wall is installed. |
X.jpg) |
X.jpg) |
| 1497: West side completed. | 1498: East side completed. |
X.jpg) |
X.jpg) |
| 1499: Canyon north side well on its way. | 1500: Without the mock-up. |
X.jpg) |
X.jpg) |
| 1503: Looking west. | 1515: East side almost finished. |
X.jpg) |
X.jpg) |
| 1519: Railroad bridge completed (commercial kit). | 1524: RR bridge painted and installed, east end. The river is "flowing". |
X.jpg) |
X.jpg) |
| 1517: East abutment ready for a bridge. | 1528: West end of the RR bridge. |
X.jpg) |
X.jpg) |
| 1525: Overview. A "concrete" pier for the future highway bridge is visible. | 1535: Aerial view. |
X.jpg) |
X.jpg) |
| 1532: Waiting for the track layers. | 1537: Trackage done. Visible, left and rear center, the piers for the Highway bridge. |
X.jpg) |
X.jpg) |
| 1544: View toward the east end of the canyon. | 1546: View from across the river. |
X.jpg) |
X.jpg) |
| 1548: Now connected with the 5 years old Part 6. | 1552: Overall view looking west. |
X.jpg) |
X.jpg) |
| 1560: Looking down in the canyon. | 1558: Tunnel east exit. |
X.jpg) |
X.jpg) |
| 1568: Tunnel west exit. | 1569: Closer view. |
X.jpg) |
X.jpg) |
| 1570: Overall view from the aisle. In the background, above the "pier", marks for the future hwy bridge intallation are visible. | 1571: View from the aisle. |
X.jpg) |
X.jpg) |
| 1572: Aerial view. | 1573: Aerial view. |
added: 1/25
|
Part 17: - Scenery
Improvements. I was not happy with the look of the "styrofoam" mesa at the west end of Yaqui Wells. And I didn't like either the "terrace hills" at Spider Bridge. So I tried to improve their look. by B. Frontanau (France) BNSF DESERT AND SIERRA SUB |
|
X.jpg) |
X.jpg) |
| 1555: Before. | 1561: After. |
X.jpg) |
X.jpg) |
| 1556: Before. | 1563: After. |
X.jpg) |
X.jpg) |
| 1565: Spider bridge, before | 1566: Spider bridge, after. |
| Now I still have to build the spectacular highway bridge (Part 16). So I'll be back. | |
added: 10/25
|
Part 18: Fighting
the Sierra grade to "Dog Soldier Pass", an ongoing struggle. ATSF 2804, an EMD GP35, and companion GE U36C, emerge from under the road bridge and onto the scene, leading a relatively short westbound "mixed merchandise" train. After a long journey through the harsh desert, the train arrives at the tiny desert community of "Yaqui Wells" which marks the foot of the sierra range and the start of the tough grade lying ahead. For the crew, the goal is to safely and surely get their train to the range pass. |
|
|
by
B. Frontanau (France) BNSF DESERT AND SIERRA SUB |
|
X.jpg) |
X.jpg) |
|
1633: Our westbound enters the scene just east of "Yaqui Wells". |
1634: In the background the almost vertical cliffs of the range can already be seen. |
X.jpg) |
X.jpg) |
| 1635: Our train won't need any helpers today, the two locos are powerful enough to conquer the sierra range. . . . | 1636: . . . Only one idling loco is visible. Some days two or three impressive lash-ups can be seen here, waiting to help long and heavy westbounds. |
X.jpg) |
X.jpg) |
| 1637: With drastically reduced speed the train negociate . . | 1638: . . . the wide curve surrounding the tiny hamlet. |
X.jpg) |
X.jpg) |
| 1639: | 1640: reaching "West Yaqui". |
X.jpg) |
X.jpg) |
| 1641: The train has reached the west switch at "West Yaqui", this is the beginning of single track territory for westbound trains. | 1642: Crossing the bridge over "Arroyo Amarillo", the tough grade starts just after the bridge. |
X.jpg) |
X.jpg) |
| 1643: With respect to the 3 % grade our westbound, now in "Notch 8", has reached "Mescalero Canyon" and is crossing "Spider bridge" which spans "Gecko creek". . . . | 1644: . . . Not much water today, but devastating "flash floods" often occur during sudden thunderstorms. |
X.jpg) |
X.jpg) |
| 1645: Fighting the 3 % grade while leaving . . . | 1646: "Mescalero canyon" and its often wild "Gecko creek" |
X.jpg) |
X.jpg) |
| 1647: Leaving "Mescalero Canyon". | 1648: No more chatter, silence has invaded the crew cab, now at reduced speed the westbound is "riding" the narrow rock shelf hanging high above the almost vertical wall of "Buzzard canyon". Holding their breath the crew concentrates on the speed and listens to the motor eventual sound changes. |
X.jpg) |
|
| 1649: High above "Buzzard canyon". Vertigo forbidden ! | 1650: The locos just went through the rock shed still struggling on the 3 % grade. |
X.jpg) |
X.jpg) |
| 1651: That's real mountain railroading. | 1652: "Riding" the canyon. |
X.jpg) |
X.jpg) |
| 1653: | 1654: Low angle view, no comment ! |
X.jpg) |
X.jpg) |
| 1655: Above the canyon. | 1656: The lead Geep negociates the short gap connecting the exit of "Buzzard canyon" and the, now close, entrance of "Dead Horse canyon". |
X.jpg) |
X.jpg) |
| 1658: The train has now entered "Dead Horse canyon" passing the retaining wall. Below the RR is "Hidden river". | 1659: |
X.jpg) |
X.jpg) |
| 1660: Deep in the canyon, the train crosses . . . | 1661: . . . the bridge spanning "Hidden" river. |
X.jpg) |
X.jpg) |
| 1662: | 1663: Past the bridge the RR encounters the rock wall marking the west end of the canyon. Engineers had to "drill" a rock tunnel in order to exit the canyon and carrying on west. |
X.jpg) |
X.jpg) |
| 1664: Eastern entrance of the short rock tunnel. | 1666: Our westbound exits the tunnel west mouth. |
X.jpg) |
X.jpg) |
| 1667: Crossing at grade the local county road. | 1669: Crossing at grade the local county road. |
X.jpg) |
X.jpg) |
| 1670: Crossing at grade the local county road. | 1668: Approaching "Sandy Flats". |
X.jpg) |
X.jpg) |
| 1671: Crossing the county road marks the end of the first grade "step", the "Sandy Flats" area, as its name suggests, is a short stretch where engines can "breathe", but the second and even harder grade "step" is around the corner. (This layout portion is removable for access to the room entry door). | 1672: In the foreground is the gravel and sand plant. |
X.jpg) |
X.jpg) |
| 1673: "Sandy Flats" area. | 1674: "Sandy Flats" area. |
X.jpg) |
X.jpg) |
| 1675: "Sandy Flats". | 1676: The train is passing by the helpers servicing and refuelling facilities. |
X.jpg) |
X.jpg) |
| 1677: The refuelling and light servicing facilities. | 1678: The refuelling and light servicing facilities. |
X.jpg) |
X.jpg) |
| 1680: Here the grade increases progressively but rapidly, back to 3 %, end of the break for the engines and the crew. | 1681: It seems to be a busy place as we can see a UPS van, a truck and a Cadillac limo. |
X.jpg) |
X.jpg) |
| 1682: | 1683: Reaching west Sandy Flats. |
X.jpg) |
X.jpg) |
| 1684: The oil pump is still active. | 1685: Exiting "Sandy Flats". |
X.jpg) |
X.jpg) |
| 1686: Entering the east portal, north track of the "Twin tunnels". | 1687: Train is going through the Twin tunnel north track. |
X.jpg) |
X.jpg) |
| 1688: Looking back at the train. | 1695: Moving west through the north track tunnel. |
X.jpg) |
X.jpg) |
| 1690: Our westbound exits the west portal of the north . . | 1691: . . track tunnel, working hard to fight the 3% grade. |
X.jpg) |
X.jpg) |
| 1692: Exiting the tunnel and crossing the short . . . | 1693: . . . bridge spanning "Jicarilla creek". |
X.jpg) |
X.jpg) |
| 1696: Aerial view. | 1697: The train reaches the west switch of Sandy Flats siding. |
X.jpg) |
X.jpg) |
| 1698: Crossing again over "Jicarilla creek". | 1700: Rolling toward the Big Loop tunnel. |
X.jpg) |
X.jpg) |
| 1701: Lead loco is entering the east portal of Big Loop tunnel. |
1703: Rear of train still going through north track of "Twin tunnels". |
X.jpg) |
X.jpg) |
| 1704: Aerial view. Fighting the continuous 3 % grade, and after negociating the Big Loop in order to gain altitude, the train will reach the track visible on the top left of the photo. | 1705: More cars are entering Big Loop tunnel. |
X.jpg) |
X.jpg) |
| 1706: "Elbow Arch", visible in the background, dwarfs the train trailing railcar. | 1707: About to exit "Big Loop" west portal, the train headlight is piercing the tunnel darkness. |
X.jpg) |
X.jpg) |
| 1708: The first engine left the tunnel already. | 1710: The head end is now out of Big Loop tunnel. |
X.jpg) |
X.jpg) |
| 1711: To the left of the train is the impressive cuesta through which the "Twin tunnels" were pierced. | 1712: The train is now well above the trackage he negociated several minutes ago. |
X.jpg) |
X.jpg) |
|
1713: The lead loco is now almost on top of "Big Loop" east portal. |
1715: Continuing the westbound journey. |
X.jpg) |
X.jpg) |
| 1716: Despite the now higher altitude, the harsh . . . | 1717: . . . desert landscape is still very present. |
X.jpg) |
X.jpg) |
| 1718: The short trestle is going to be tested one more time, let's cross our fingers ! | 1719: The train is now at the grade crossing by "Bernie's shiner". |
X.jpg) |
X.jpg) |
| 1720: Negociating the curve by "Bernie's shiner". | 1721: Negociating the curve by "Bernie's shiner". |
X.jpg) |
X.jpg) |
|
1721a: The last railcar clears the grade crossing at "Bernie's shiner". |
1722: The train passes through narrow "Chuckwalla cut". |
X.jpg) |
X.jpg) |
| 1723: The train passes through narrow "Chuckwalla cut". | 1724: Those horses don't seem afraid by our train. They certainly escaped from nearby Palo Verde ranch. |
X.jpg) |
X.jpg) |
| 1725: Riding over the "Palo Verde" ranch road culvert, the train is now entering the east portal of a short tunnel. | 1727: Exiting the west portal of the same tunnel. |
X.jpg) |
X.jpg) |
| 1728: Passing over "Black Widow" wash. | 1729: Rolling through the short Tunnel. |
X.jpg) |
X.jpg) |
| 1730: Exiting the west portal. | 1731: Riding over "Yucca wash". |
X.jpg) |
X.jpg) |
|
1732: The train has reached "Rattler Gap", end of
the second grade "step". It will now encounter a 2 % . . . |
1733: . . . down grade during the
next couple miles, giving a chance to the prime movers to cool down. |
X.jpg) |
X.jpg) |
| 1734: "Rattler Gap". | 1740: "Rattler Gap". |
| We want to tell why this Sullivan's Curve model is having one track only compared to today. But Bernard built his Sullivan's Curve model before SP started to build their "new" line, as it was in the late 50's and early 60's. | |
| AT&SF (Sante Fe) built in 1913 a track around the Sullivan's Rock formations to get a line to the Cajon Summit with just 2,2 % grade because their first (old) line has a 3 % grade. SP (Southern Pacific) built their Palmdale-Colton Cutoff in 1967. From that moment on we were having two tracks around the curve. But in 2008, BNSF built their 3rd track through Cajon and double tracked their 2,2 % track. In other words, we are having now 3 tracks in real life. | |
X.jpg) |
X.jpg) |
| 1741: Entering magnificent "Sullivan's Curve". | 1742: Rolling along famous "Sullivan's Curve". |
X.jpg) |
X.jpg) |
| 1743: Going down the 2 % grade between "Sullivan's . . . | 1744: . . . Curve" eons old rock formations. |
X.jpg) |
X.jpg) |
| 1745: | 1746: "Sullivan's Curve". |
X.jpg) |
X.jpg) |
| 1747: | 1748: Downgrade at "Sullivan's Curve". |
X.jpg) |
X.jpg) |
| 1749: | 1750: Exiting the rock cut past "Sullivan's Curve". |
X.jpg) |
X.jpg) |
| 1756: | 1757: Downgrade toward "Rainbow Cut". |
X.jpg) |
X.jpg) |
| 1758: Entering "Rainbow Cut". | 1759: Negociating narrow "Rainbow Cut". |
X.jpg) |
X.jpg) |
| 1760: Deep in the cut. | 1761: Exiting "Rainbow Cut", this is the end of the 2% downgrade. |
X.jpg) |
X.jpg) |
| 1762: Crossing the bridge spanning "Hoodoo Wash". . . | 1763: . . Past the bridge starts the third 3% upgrade "step". |
X.jpg) |
X.jpg) |
| 1764: Just coming from the bridge. | 1765: Encountering another narrow cut. |
X.jpg) |
X.jpg) |
| 1766: Crossing at grade "Squaw Flats road". | 1767: Passing the unique rock formations. |
X.jpg) |
X.jpg) |
| 1768: Reaching the foot of "Painted Mesa". In the . . . | 1770: . . process the train passes by the local "tourist trap". |
X.jpg) |
X.jpg) |
| 1771: Struggling to fight gravity the train approaches the US 38 grade crossing. | 1772: Probably the vehicle of a railfan, a '71 Cuda. |
X.jpg) |
X.jpg) |
| 1773: Our westbound cuts US 38 at grade. | 1774: Our westbound cuts US 38 at grade. |
|
|
X.jpg) |
| 1775: The train is dwarfed by the mesa wall, . . . | 1776: . . . above all is an arch known as "Looking Eye". |
X.jpg) |
X.jpg) |
| 1777: Running along "Painted Mesa". Below the train . . . | 1778: . . . is dry "Diamond Back lake". |
X.jpg) |
X.jpg) |
| 1779: Spectacular arch "Looking Eye". | 1780: Reaching the bridge spanning dry "Diamond Back lake". |
X.jpg) |
X.jpg) |
| 1781: Crossing the bridge over dry "Diamond back lake". In the background, beyond the bridge, is the mouth of "Spaniard Canyon". | 1784: Moving on west, leaving behind the dry lake. |
X.jpg) |
X.jpg) |
| 1783: Moving on west, leaving behind the dry lake . . . | 1785: . . . toward the "Box Tunnel". |
X.jpg) |
X.jpg) |
| 1786: Approaching "Box Tunnel" that allows the RR to "punch" through the mesa. | 1787: Approaching "Box Tunnel" that allows the RR to "punch" through the mesa. |
X.jpg) |
X.jpg) |
| 1788: Entering "Box Tunnel". | 1789: Driving a few dirt roads, we arrive in time, a few miles higher, to catch our train exiting "Bear Paw Tunnel". We now stand on the other side of the tracks. |
X.jpg) |
X.jpg) |
| 1790: Exiting "Bear Paw tunnel". | 1791: Exiting "Bear Paw tunnel", high sierra landscape welcomes our westbound, fall is already there and aspens turned gold. |
X.jpg) |
X.jpg) |
| 1792: Just after the tunnel to the short bridge. | 1793: Crossing the very short bridge spanning "Emerald Lake" outlet. |
X.jpg) |
X.jpg) |
| 1794: Going along "Emerald Lake" the train grinds its last miles to "Windy Notch", the highest point on the line. | 1795: The train is still exiting the tunnel. |
X.jpg) |
X.jpg) |
| 1798: Little bridge of Emerald Lake outlet. | 1799: In "notch 8" along and above the lake. |
X.jpg) |
X.jpg) |
| 1800: Passing the lake. | 1801: Looking back at the train. |
X.jpg) |
X.jpg) |
| 1805: In order to gain altitude the train negociates the big turnback curve to reach "Windy Notch". | 1806: A look back on the Emerald Lake. |
X.jpg) |
X.jpg) |
| 1808: The lead loco just passed "Windy Notch" and will enter a snowshed. | 1810: The end of the train is still rolling around the lake. |
X.jpg) |
X.jpg) |
| 1811: Going through the snowshed, now the train encounters a gentle . . . | 1812: . . . downgrade toward the RR complex of "Dog Soldier Pass". |
X.jpg) |
X.jpg) |
| 1813: About to reach the east switch of "Dog Soldier Pass". | 1814: Still going through the snowshed. |
X.jpg) |
X.jpg) |
| 1815: Reaching the east switch of "Dog Soldier Pass" . . . | 1816: . . . and passing over the "Bear Paw tunnel" portal. |
X.jpg) |
X.jpg) |
| 1820: The train is now breathing better, taking advantage of the flat stretch of track found at the pass. | 1821: The train is passing over the "Bear Paw tunnel". |
X.jpg) |
X.jpg) |
| 1823: | 1824: The train is now negociating the pass trackage, slow speed is here mandatory. |
X.jpg) |
X.jpg) |
| 1825: The train passes by the sign marking the top of "Dog Soldier Pass". | 1827: |
X.jpg) |
X.jpg) |
| 1828: | 1829: Here, progressively, starts the downgrade to the west. The train is reaching "West Summit". |
X.jpg) |
X.jpg) |
| 1830: | 1831: Pretty soon we will hear dynamic brakes howling. |
X.jpg) |
X.jpg) |
| 1833: | 1834: The train is now at "West summit" and dynamic braking starts to howl for the coming downgrade. |
X.jpg) |
X.jpg) |
| 1835: Approaching the snowsheds marking . . . | 1839: . . . the end of "West Summit" |
X.jpg) |
X.jpg) |
| 1840: Entering the snowsheds, our westbound disappears from the scene. | 1841: The second diesel loco is entering as well. |
X.jpg) |
X.jpg) |
| 1843: Looking back at the train, the locos have . . . | 1842: . . . already been swallowed by the mountain. |
X.jpg) |
X.jpg) |
| 1846: Pretty soon mountain calm will be back at the pass, but for how long ? | 1844: End of train. |
added: 10/25
|
In search of realism, after scenery: CONTROL
AND SOUNDS. After 13 years of
construction and a virtually finished layout, time came to cogitate about
how to power the "beast", control trains and getting always closer to
realism, therefore having the pleasure to fully enjoy the miniature world
wanted and created with stubbornness. Choosing DCC would have meant a top of the line and very efficient system, DCC decoder equiped locos and, icing on the cake, a vertiginous cost. BUT following the trains along, and controlling them without tethered cables plus activating onboard sounds, are a real thrill. I then heard about Blunami decoders, they bear a Bluetooth chip and the commands and control are sent "flying" directly from your smartphone to the decoders. So you just need fixed DC power in the tracks, 12 to 14 vdc is a good range, a decoder in the loco, and installing a free app on the smartphone. There is one for IOS and one for Android. Your choice. There are a lot of videos and explanations on the web. Don't get me wrong, this is not a commercial, I am not close from the makers, nor am I paid for this post. I just know that many modelers hesitate, like me, before acquiring an expensive DCC system. It's just a way to keep your DC power but still having the advantages offered by DCC. The other good news are that you can also control your loco on a DCC layout. It also works for "Dead Rail" users, providing they have good onboard batteries. All what it takes is power in the tracks or batteries. True, you still have to equip your DC locos with Blunami decoders plus a speaker. A current keeper is also a good idea, think dirty spots. But it's so easy to use, no test track, no JMRI, actually I don't even know what JMRI is !! And no intimidating dive into complex CVs settings, oh boy ! I already equiped two locos, an Atlas GE U36C and a Kato GP35. Here attached you will find photos of my first installation. In order to power the layout I cut gaps to create 4 power districts, I also cut the main "bus" cable, which was continuous, to match the districts. I installed 4 MeanWell power supplies, one for each district, they deliver between 13 and 14 vdc at 6A, more amps than I will ever need per district. For your info, when I built the layout, and in anticipation of the huge length of future tracks, I used from the beginning 0,5 mm2 short stranded wires as feeders soldered to the tracks, extensions from feeders to main "bus" are solid 2,5mm2 wires, and main "bus" is stranded 4mm2 cable. That's what it takes for long runs. Despite this I recently added some feeders where voltage drops occured. |
|
|
by
B. Frontanau (France) BNSF DESERT AND SIERRA SUB |
|
X.jpg) |
X.jpg) |
| 1627: I had to cut a portion of the weight to make room for a current keeper. The original board and bulbs are still present. | 1628: The Blunami decoder is installed with diode equiped leds for headlights and roof rotary beacon. |
X.jpg) |
X.jpg) |
| 1629: Current keeper installed on the rear "tower" with a tiny piece of double sided tape. | 1630: The small but very efficient ultra flat phone speakers I purchased, only 3mm thick ! Found on the website of a UK company. |
X.jpg) |
X.jpg) |
| 1631: Speaker installed. | 1632: One of the four power supplies. |
Did you see the First Section: Part 1 to Part 10
- click here
all photos copyright by Bernard
Frontanau, France
| More photos of the BNSF DESERT AND SIERRA SUB will be shown in the future - just check back ! |
go back to the Diorama main page - click here / go back to the Layout main page - click here
over all copyright by Werner Meer,
Switzerland - 2025
.jpg)
.jpg)
.jpg)
.jpg)
.jpg)
.jpg)
.jpg)
.jpg)
.jpg)
.jpg)
.jpg)
.jpg)
.jpg)
.jpg)
.jpg)
.jpg)
.jpg)
.jpg)
.jpg)
.jpg)
.jpg)
.jpg)
.jpg)
.jpg)
.jpg)
.jpg)
.jpg)
.jpg)
.jpg)
.jpg)
.jpg)
.jpg)
.jpg)
.jpg)
.jpg)
.jpg)
.jpg)
.jpg)
.jpg)
.jpg)
.jpg)
.jpg)
.jpg)
.jpg)
.jpg)
.jpg)
.jpg)
.jpg)
.jpg)
.jpg)
.jpg)
.jpg)
.jpg)
.jpg)
.jpg)
.jpg)
.jpg)
.jpg)
.jpg)
.jpg)
.jpg)
.jpg)
.jpg)
.jpg)
.jpg)
.jpg)
.jpg)
.jpg)
.jpg)
.jpg)
.jpg)
.jpg)
.jpg)
.jpg)
.jpg)
.jpg)
.jpg)
.jpg)
.jpg)
.jpg)
.jpg)
.jpg)
.jpg)
.jpg)
.jpg)
.jpg)
.jpg)
.jpg)
.jpg)
.jpg)
.jpg)
.jpg)
.jpg)
.jpg)
.jpg)
.jpg)
.jpg)
.jpg)
.jpg)
.jpg)
.jpg)
.jpg)
.jpg)
.jpg)
.jpg)
.jpg)
.jpg)
.jpg)
.jpg)
.jpg)
.jpg)
.jpg)
.jpg)
.jpg)
.jpg)
.jpg)
.jpg)
.jpg)
.jpg)
.jpg)
.jpg)
.jpg)
.jpg)
.jpg)
.jpg)
.jpg)
.jpg)
.jpg)
.jpg)
.jpg)
.jpg)
.jpg)
.jpg)
.jpg)
.jpg)
.jpg)
.jpg)
.jpg)
.jpg)
.jpg)
.jpg)
.jpg)
.jpg)
.jpg)
.jpg)
.jpg)
.jpg)
.jpg)
.jpg)
.jpg)
.jpg)
.jpg)
.jpg)
.jpg)
.jpg)
.jpg)
.jpg)
.jpg)
.jpg)
.jpg)
.jpg)
.jpg)
.jpg)
.jpg)
.jpg)
.jpg)
.jpg)
.jpg)
.jpg)
.jpg)
.jpg)
.jpg)
.jpg)
.jpg)
.jpg)
.jpg)
.jpg)
.jpg)
.jpg)
.jpg)
.jpg)
.jpg)
.jpg)
.jpg)
.jpg)
.jpg)
.jpg)
.jpg)
.jpg)
.jpg)
.jpg)
.jpg)
.jpg)
.jpg)
.jpg)
.jpg)
.jpg)
.jpg)
.jpg)
.jpg)
.jpg)
.jpg)
.jpg)
.jpg)
.jpg)
.jpg)
.jpg)
.jpg)
.jpg)
.jpg)
.jpg)
.jpg)
.jpg)
.jpg)
.jpg)
.jpg)
.jpg)
.jpg)
.jpg)
.jpg)
.jpg)
.jpg)
.jpg)
.jpg)
.jpg)
.jpg)
.jpg)
.jpg)
.jpg)
.jpg)
.jpg)
.jpg)
.jpg)
.jpg)
.jpg)
.jpg)
.jpg)
.jpg)
.jpg)
.jpg)
.jpg)
.jpg)
.jpg)
.jpg)
.jpg)
.jpg)
.jpg)
.jpg)
.jpg)
.jpg)
.jpg)
.jpg)
.jpg)
.jpg)
.jpg)
.jpg)
.jpg)
.jpg)
.jpg)
.jpg)
.jpg)
.jpg)
.jpg)
.jpg)
.jpg)
.jpg)
.jpg)
.jpg)
.jpg)
.jpg)
.jpg)
.jpg)
.jpg)
.jpg)
.jpg)
.jpg)
.jpg)
.jpg)
.jpg)
.jpg)
.jpg)
.jpg)
.jpg)
.jpg)
.jpg)
.jpg)
.jpg)
.jpg)
.jpg)
.jpg)
.jpg)
.jpg)
.jpg)
.jpg)
.jpg)
.jpg)
.jpg)
.jpg)
.jpg)
.jpg)
.jpg)
.jpg)
.jpg)
.jpg)
.jpg)
.jpg)
.jpg)
.jpg)
.jpg)
.jpg)
.jpg)
.jpg)
.jpg)
.jpg)
.jpg)
.jpg)
.jpg)
.jpg)
.jpg)
.jpg)
.jpg)
.jpg)
.jpg)
.jpg)
.jpg)
.jpg)
.jpg)
.jpg)
.jpg)
.jpg)
.jpg)
.jpg)
.jpg)
.jpg)
.jpg)
.jpg)
.jpg)
.jpg)
.jpg)
.jpg)
.jpg)
.jpg)
.jpg)
.jpg)
.jpg)
.jpg)
.jpg)
.jpg)
.jpg)
.jpg)
.jpg)
.jpg)
.jpg)
.jpg)
.jpg)
.jpg)
.jpg)
.jpg)
.jpg)
.jpg)
.jpg)
.jpg)
.jpg)
.jpg)
.jpg)
.jpg)
.jpg)
.jpg)
.jpg)
.jpg)
.jpg)
.jpg)
.jpg)
.jpg)
.jpg)
.jpg)
.jpg)
.jpg)
.jpg)
.jpg)
.jpg)
.jpg)
.jpg)
.jpg)
.jpg)
.jpg)
.jpg)
.jpg)
.jpg)
.jpg)
.jpg)
.jpg)
.jpg)
.jpg)
.jpg)
.jpg)
.jpg)
.jpg)
.jpg)
.jpg)
.jpg)
.jpg)
.jpg)
.jpg)
.jpg)
.jpg)
.jpg)